Understanding Finish Trim: Types and Uses
Finish trim plays a pivotal role in elevating the aesthetic appeal and functionality of interior spaces. Whether it’s the graceful crown molding seamlessly connecting walls and ceilings or the sleek baseboards anchoring floors, finish trim acts as the final touch in a home’s design narrative. Its purpose extends beyond decoration; it provides protection to walls, conceals gaps and imperfections, and enhances the overall cohesion of interior architecture. Recognizing the diversity and applications of finish trim allows homeowners and contractors alike to make informed choices that align with their style, durability requirements, and budget considerations.
For a comprehensive overview of available options and expert guidance, visit Finish trim to explore tailored solutions for your project.
Different Styles of Finish Trim and Moulding
Finish trim encompasses a vast array of styles and profiles, each serving specific aesthetic and functional purposes. From traditional to modern, the styles vary in complexity, proportion, and detailing:
- Baseboards: Typically installed at the junction of wall and floor, baseboards come in simple or elaborate profiles. They provide a clean transition and protect walls from kicks and scuffs.
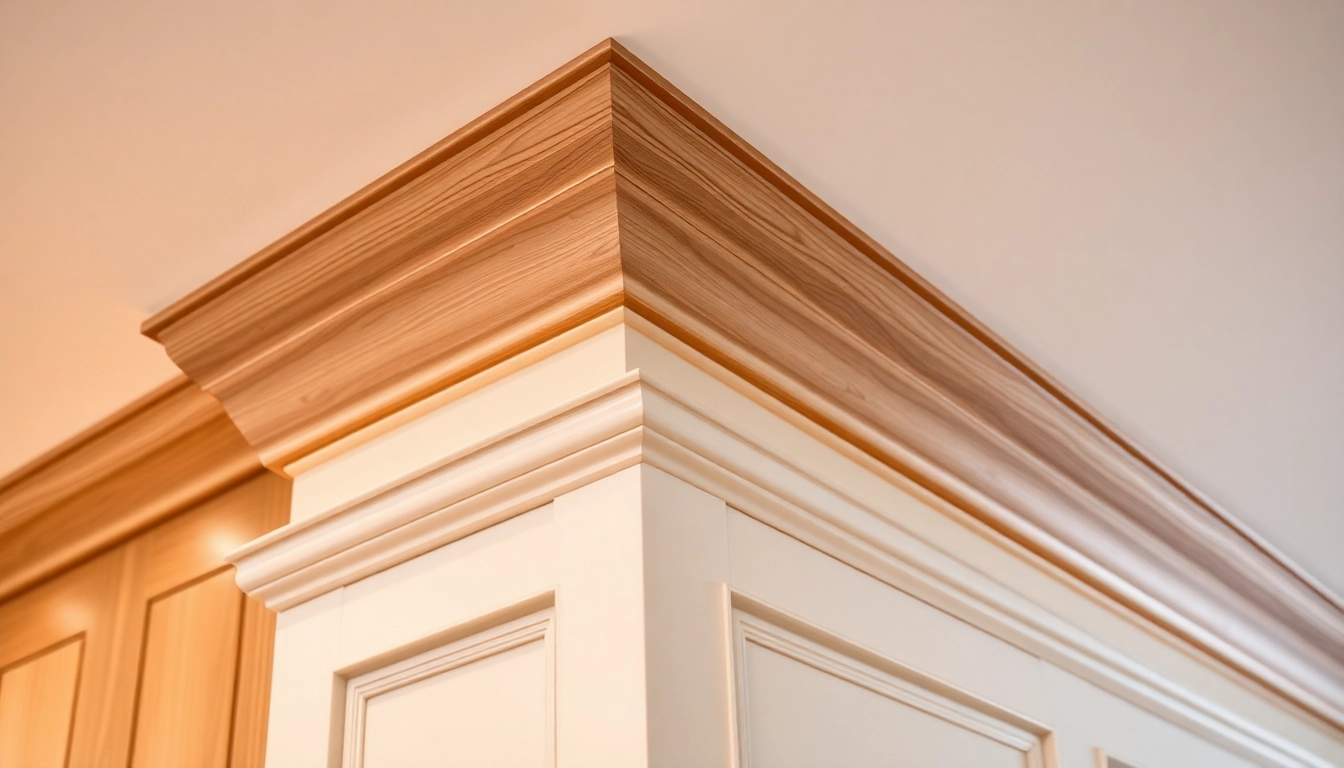
- Crown Molding: Sitting at the intersection of wall and ceiling, crown molding adds elegance and visual height. Available in various profiles, it can be subtle or ornate.
- Door and Window Casing: Frames around doors and windows, casing styles range from minimal modern trims to detailed historical moldings.
- Panel Molding: Decorative flat or raised panels used on walls, doors, or cabinets, adding texture and sophistication.
- Chair Rail: A horizontal molding often running around the middle of a wall, protecting it from furniture and adding a stylistic element.
Each style can be customized with different profiles—such as square, beveled, or ogee—and decorative accents to match the interior’s thematic consistency.
Common Applications in Residential Interiors
Finish trim is integral to various residential applications, serving both aesthetic and functional roles:
- Enhancing Room Transitions: Mouldings like crown and baseboards create a smooth, visually appealing transition between walls, ceilings, and floors, imparting a polished look.
- Framing Architectural Features: Trims delineate built-ins, niches, or archways, emphasizing architectural details that add character and depth.
- Concealing Imperfections: Trim covers gaps, uneven edges, and drywall seams, ensuring a neat and professional finish.
- Creating Visual Hierarchy: Varying trim heights and profiles establish focal points or differentiate zones within an open-concept layout.
- Interior Design Accents: Decorative trims and molding profiles serve as focal points, aligning with various interior themes such as rustic, contemporary, or classic.
Properly selected and installed finish trim can dramatically impact the perception of space, making it appear more refined and carefully curated.
Choosing the Right Finish Trim for Your Space
Selecting appropriate finish trim involves a thoughtful assessment of style, scale, material, and budget. Key considerations include:
- Room Style and Theme: Traditional homes often favor intricate, detailed moldings, whereas modern interiors may prefer sleek, minimalist profiles.
- Ceiling Height: High ceilings accommodate larger, more elaborate trim styles, while lower ceilings benefit from proportionate, less bulky moldings.
- Material Compatibility: Ensure the trim material complements the existing decor, wall surfaces, and other architectural elements.
- Durability Needs: Areas prone to moisture or impact, such as kitchens or mudrooms, require more resilient materials.
- Budget Constraints: Cost varies based on material, profile complexity, and labor. Prioritize options that balance aesthetics and affordability.
Consulting with a professional or utilizing design software can help visualize the final effect, ensuring optimal style and scale alignment.
Selecting Quality Materials for Finish Trim
Wood Types and Alternatives
The foundation of any excellent finish trim is the choice of material. Wood remains the traditional standard, offering versatility, ease of finishing, and natural beauty. Common species include pine, oak, maple, and cherry, each with unique grain patterns, hardness, and cost points. For example:
- Pine: Affordable, lightweight, and easy to work with—ideal for DIY projects.
- Oak: Harder and more durable; lends a classic appearance suitable for high-traffic areas.
- Maple and Cherry: Offer fine grain and rich coloration, often used in luxury interiors.
However, wood isn’t the only option. Alternatives like medium-density fiberboard (MDF), PVC, and composite materials are gaining popularity due to their stability, moisture resistance, and lower cost.
Factors Influencing Durability and Appearance
Durability depends on factors such as material hardness, resistance to moisture, and finishing techniques. Appearance is influenced by grain, color, and surface treatments. For instance, MDF has a smooth surface ideal for painting, while natural wood can be stained to highlight grain patterns. Consider the following:
- Environmental Exposure: Moisture-prone areas benefit from water-resistant materials.
- Finish Compatibility: Some materials accept paint or stain better, affecting final appearance.
- Maintenance and Lifespan: Durable materials reduce repainting and repair costs over time.
Choosing the right material based on these factors ensures longevity and consistent visual quality.
Cost-Effective Material Options
Balancing quality with budget is essential. MDF and PVC trims are cost-effective alternatives that provide good aesthetics and durability at a fraction of hardwood costs. Specifically:
- MDF: Strong, paintable, and uniform, suitable for most interior trims.
- PVC: Impervious to moisture, ideal for bathrooms and kitchens, with easy installation.
- Engineered Wood: Manufactured to maximize strength and minimize waste, offering a sustainable option.
Investing in quality adhesives and finishing products can significantly enhance the lifespan and appearance of budget trims, making them virtually indistinguishable from higher-end materials.
Best Practices for Installing Finish Trim
Preparation and Measuring Techniques
Accurate measurement and preparation are fundamental to a seamless finish. Begin by carefully measuring wall lengths and noting angles, especially in irregular rooms. Use a tape measure, combination square, and a digital angle finder for precision.
Plan trim layout to minimize the number of cuts and joints. Mark your measurements clearly with a pencil, and double-check before cutting. Remember, measuring twice reduces waste and errors.
Cutting and Fitting Tips for Precise Joints
Correct cuts are crucial for tight joints. Miter cuts at 45° are standard for corners, but compound angles may be necessary for irregular walls. Use a sharp, fine-tooth saw and a miter box or a power miter saw for accuracy.
Dry-fit pieces before fastening to identify potential gaps or misalignments. Use shims or filler strips for minor adjustments, ensuring a flush, professional look.
Painting, Staining, and Finishing for a Flawless Look
Finishing enhances the visual appeal and protection of trim. For painted trims, prime the surface first, followed by two coats of high-quality paint, utilizing brushes or rollers designed for trim work. Satin or semi-gloss finishes are popular for their durability and aesthetic appeal.
Staining involves applying a wood stain to accentuate natural grain, followed by a protective topcoat, such as polyurethane. For an even finish, sand lightly between coats.
Proper drying and curing times are essential to prevent smudges and uneven coatings, preserving the crispness of edges and joints.
Achieving a High-Quality Finish on Trim
Sand and Smooth Techniques for a Perfect Surface
Sanding consistently is key to a smooth finish. Start with medium-grit sandpaper (120-150 grit) to remove roughness, progressing to fine grit (220-320) for a polished surface. Pay particular attention to edges and corners to eliminate any splinters or rough spots.
Use a sanding block or pneumatic sander for uniformity. After sanding, wipe down the trim with a tack cloth to remove dust before finishing.
Optimal Paints and Finishes for Longevity
The choice of paint or finish substantially impacts longevity and appearance. For interior trim, high-quality latex paints such as Benjamin Moore Aura or Sherwin-Williams Emerald provide durability and color retention. These paints also offer various sheens—satin and semi-gloss are preferred for their ease of cleaning and reflective qualities.
For stained finishes, oil-based polyurethanes offer superior protection, especially in high-traffic areas. Water-based finishes are environmentally friendly and dry faster, making them suitable for quick projects.
Common Challenges and How to Avoid Them
Challenges in finish carpentry include uneven joints, paint drips, and misaligned cuts. To avoid these:
- Measure carefully and double-check dimensions.
- Use sharp blades and proper cutting tools.
- Practice proper installation techniques, ensuring nails and adhesives do not cause distortion.
- Apply finishes in a dust-free environment and follow manufacturer instructions for drying times.
Regularly inspecting your work during installation allows for corrections and ensures a results that rivals professional craftsmanship.
Maintenance and Care for Your Finish Trim
Cleaning Tips to Preserve Appearance
Routine cleaning involves gentle dusting with a microfiber cloth or a soft brush. For more stubborn grime, use a damp cloth with mild soap, avoiding abrasive cleaners that could damage finishes. Regular cleaning prevents buildup that dulls the appearance and protects trims from staining or damage over time.
Repairing Minor Damages Effectively
Minor scratches, dents, or chips can typically be repaired with touch-up kits or by sanding and refinishing small areas. For deep gouges, filling with wood filler, sanding smooth, and repainting or staining are effective solutions. Prompt repairs maintain the seamless look and prevent further deterioration.
Developing a routine inspection schedule enables early intervention, keeping your trim looking pristine for years to come.
When to Replace or Refinish Trim
Deciding between refinishing or replacing depends on wear and damage severity. If the finish is chipped, peeling, or heavily stained beyond repair, replacement may be more cost-effective. Conversely, lightly worn trims can often be refreshed with sanding and a new coat of paint or stain.
Assessing the structural integrity and visual impact will guide the best course of action, ensuring your interiors remain attractive and functional.